Setting up ISAPI on IIS 10
Introduction
OK so it’s 2020 and how many people are developing ISAPI extensions? More than you might imagine. Yeah Ruby on Rails and Rust are all the rage these days, but some people still need to work with ISAPI for a bunch of business reasons. I recently had to setup IIS 10 for work with ISAPI on Windows 10. I read a lot of articles on how to do it. None of them were complete, resulting in reading several articles to get something working so I put this together, mainly for my own benefit (because I really don’t need to spend that much time doing this again!). I’m sharing it so you don’t have to go through this.
There’s an interesting gotcha if you’re developing a 32 bit ISAPI extension. Don’t worry I cover that at the end.
I was trying to get a simple ISAPI extension to work before trying anything else. My guess is most of you are working on legacy code, but a few of you may have been instructed to write a new ISAPI. Here’s a good starting point for a simple ISAPI extension if you haven’t already written one.
Creating an ISAPI extension: https://www.codeproject.com/Articles/1432/What-is-an-ISAPI-Extension
Installing IIS components
IIS components are installed via the Windows features dialog.
In the Windows 10 search box type “Turn Windows features on and off”, when windows shows you the result that matches press return (or click it).
The feature selection box is displayed. Select the items highlighted red in the image shown below. Click OK.
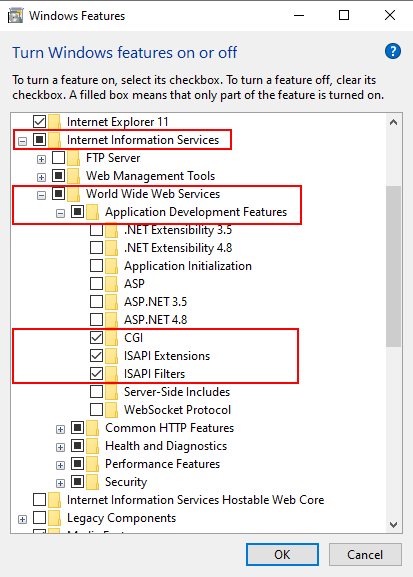
If you’ve already got partway through configuring IIS Manager and have realised you don’t have all the required components installed that’s OK, just install them and then close IIS Manager and reopen it (I found that if I didn’t do that not all the component parts would show in IIS Manager, making finding say ISAPI and CGI Restrictions impossible.
Configuring IIS Manager
Start Internet Information Services Manager.
Website
First of all we need a website to work with. If you’ve already got one skip the next few lines.
- Add a test website. Right click on “Sites” in the left hand menu and choose “Add Website…”
- Choose a website name. For example: “test”.
- Choose a location for the website. For example: C:\testISAPIWebsite
- Change the port number (just for testing) so that it doesn’t conflict with any other sites you have. For example: 81.
Handler Mappings
- Select the server node on the left hand side and double click click on Handler Mappings on the right hand size.

- The handler mappings are displayed.
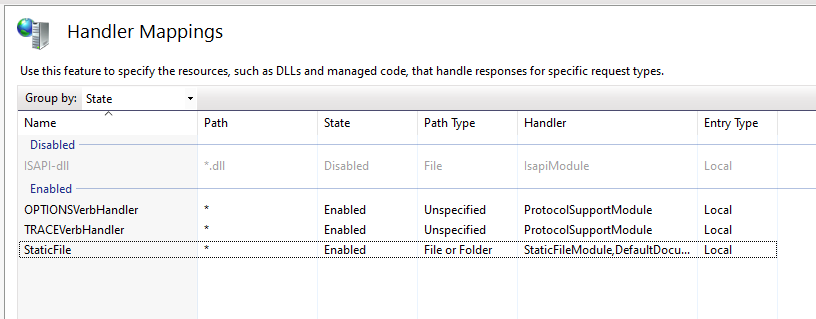
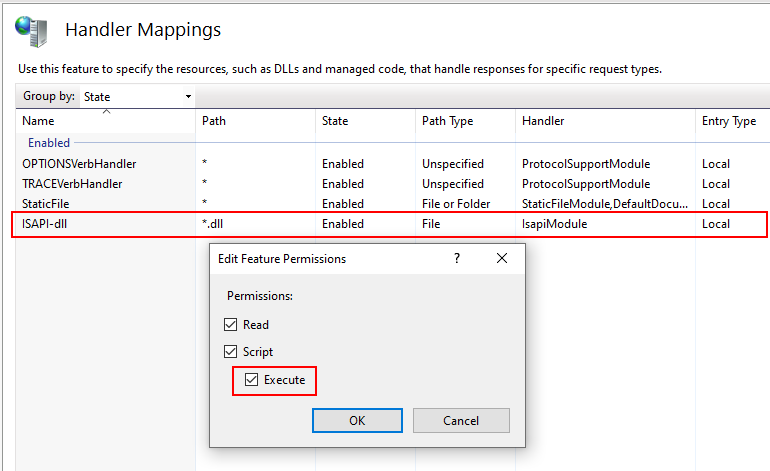
- Right click in empty space and choose “Edit Feature Permissions…”.
- The Edit Feature Permissions dialog is displayed. Enable Read, Script and Execute permissions. When you select the execute check box you’ll notice the entry for ISAPI dlls is added to the displayed Handler Mappings. Click OK.
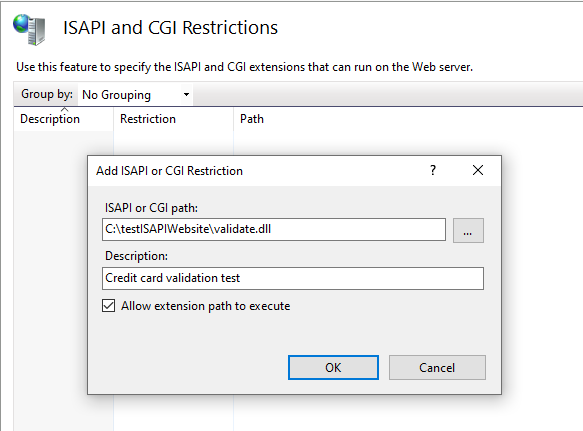
ISAPI and CGI Restrictions
- Select the server node on the left hand side and double click click on “ISAPI and CGI Restrictions” on the right hand size.
- Right click in empty space and choose “Add…”.
- Add the path to your ISAPI dll, a description and select the check box so that it is allowed to execute. Click OK.
-
This will place a web.config in the directory that contains the DLL. It will look something like this:
<?xml version="1.0" encoding="UTF-8"?>
<configuration>
    <system.webServer>
        <handlers accessPolicy="Read, Execute, Script">
            <remove name="ISAPI-dll" />
            <add name="ISAPI-dll" path="*.dll" verb="*" modules="IsapiModule" scriptProcessor="C:\testISAPIWebsite\validate.dll" resourceType="File" requireAccess="Execute" allowPathInfo="true" preCondition="bitness32" />
        </handlers>
    </system.webServer>
</configuration>
32 bit ISAPI extensions
If your ISAPI is 32 bit you’ll need to enable them. Go to application pools (under the server node), select the application pool that your website is in, right click, choose “Advanced Settings…”. Change the “Enable 32-Bit Applications” setting to True.
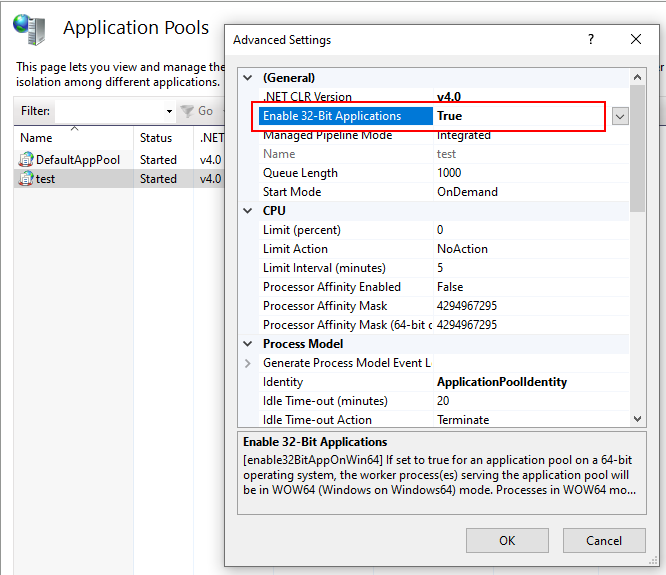
64 bit ISAPI extensions
If your ISAPI is 64 bit you’ll need to ensure that you haven’t got 32 bit extensions enabled. Go to application pools (under the server node), select the application pool that your website is in, right click, choose “Advanced Settings…”. Change the “Enable 32-Bit Applications” setting to False.
Authentication problems
If when trying to view your web pages you get strange error messages, select the server node on the left then go to “Feature Delegation” and turn any entries that are “Read only” to “Read/Write”. Then restart the server (top of the right hand bar).
Note that I’m assuming you’re working on a Dev machine. If you’re working on a production machine you might want to be a bit less cavalier than just turning all settings to Read/Write – work through them one at a time to find out what you need and change only that.
Trying out the website
If we assume your ISAPI is called validate.dll you should be able to test your ISAPI in a browser using http://localhost:81/validate.dll?12345678